

Speaker Placement Guide - How to Maximize Soundstage and Imaging
The Complete Step-by-Step Guide

17.08.2026 09:17 | ~7 min read
If you add up everything correct speaker placement contributes to the overall sound quality of a system, it turns out that this contribution can easily exceed an upgrade to the next price tier. In total, placement can account for 20-30% of the final result. Not bad for a step that costs you exactly nothing. Which is why this expert guide to loudspeaker placement can and should become the beginner audiophile’s desk reference.
Why speaker placement matters so much
Room modes
As we already noted in our article on choosing a listening room, standing waves always build up between the parallel surfaces of a listening space. The frequency of the first axial mode is calculated as follows:
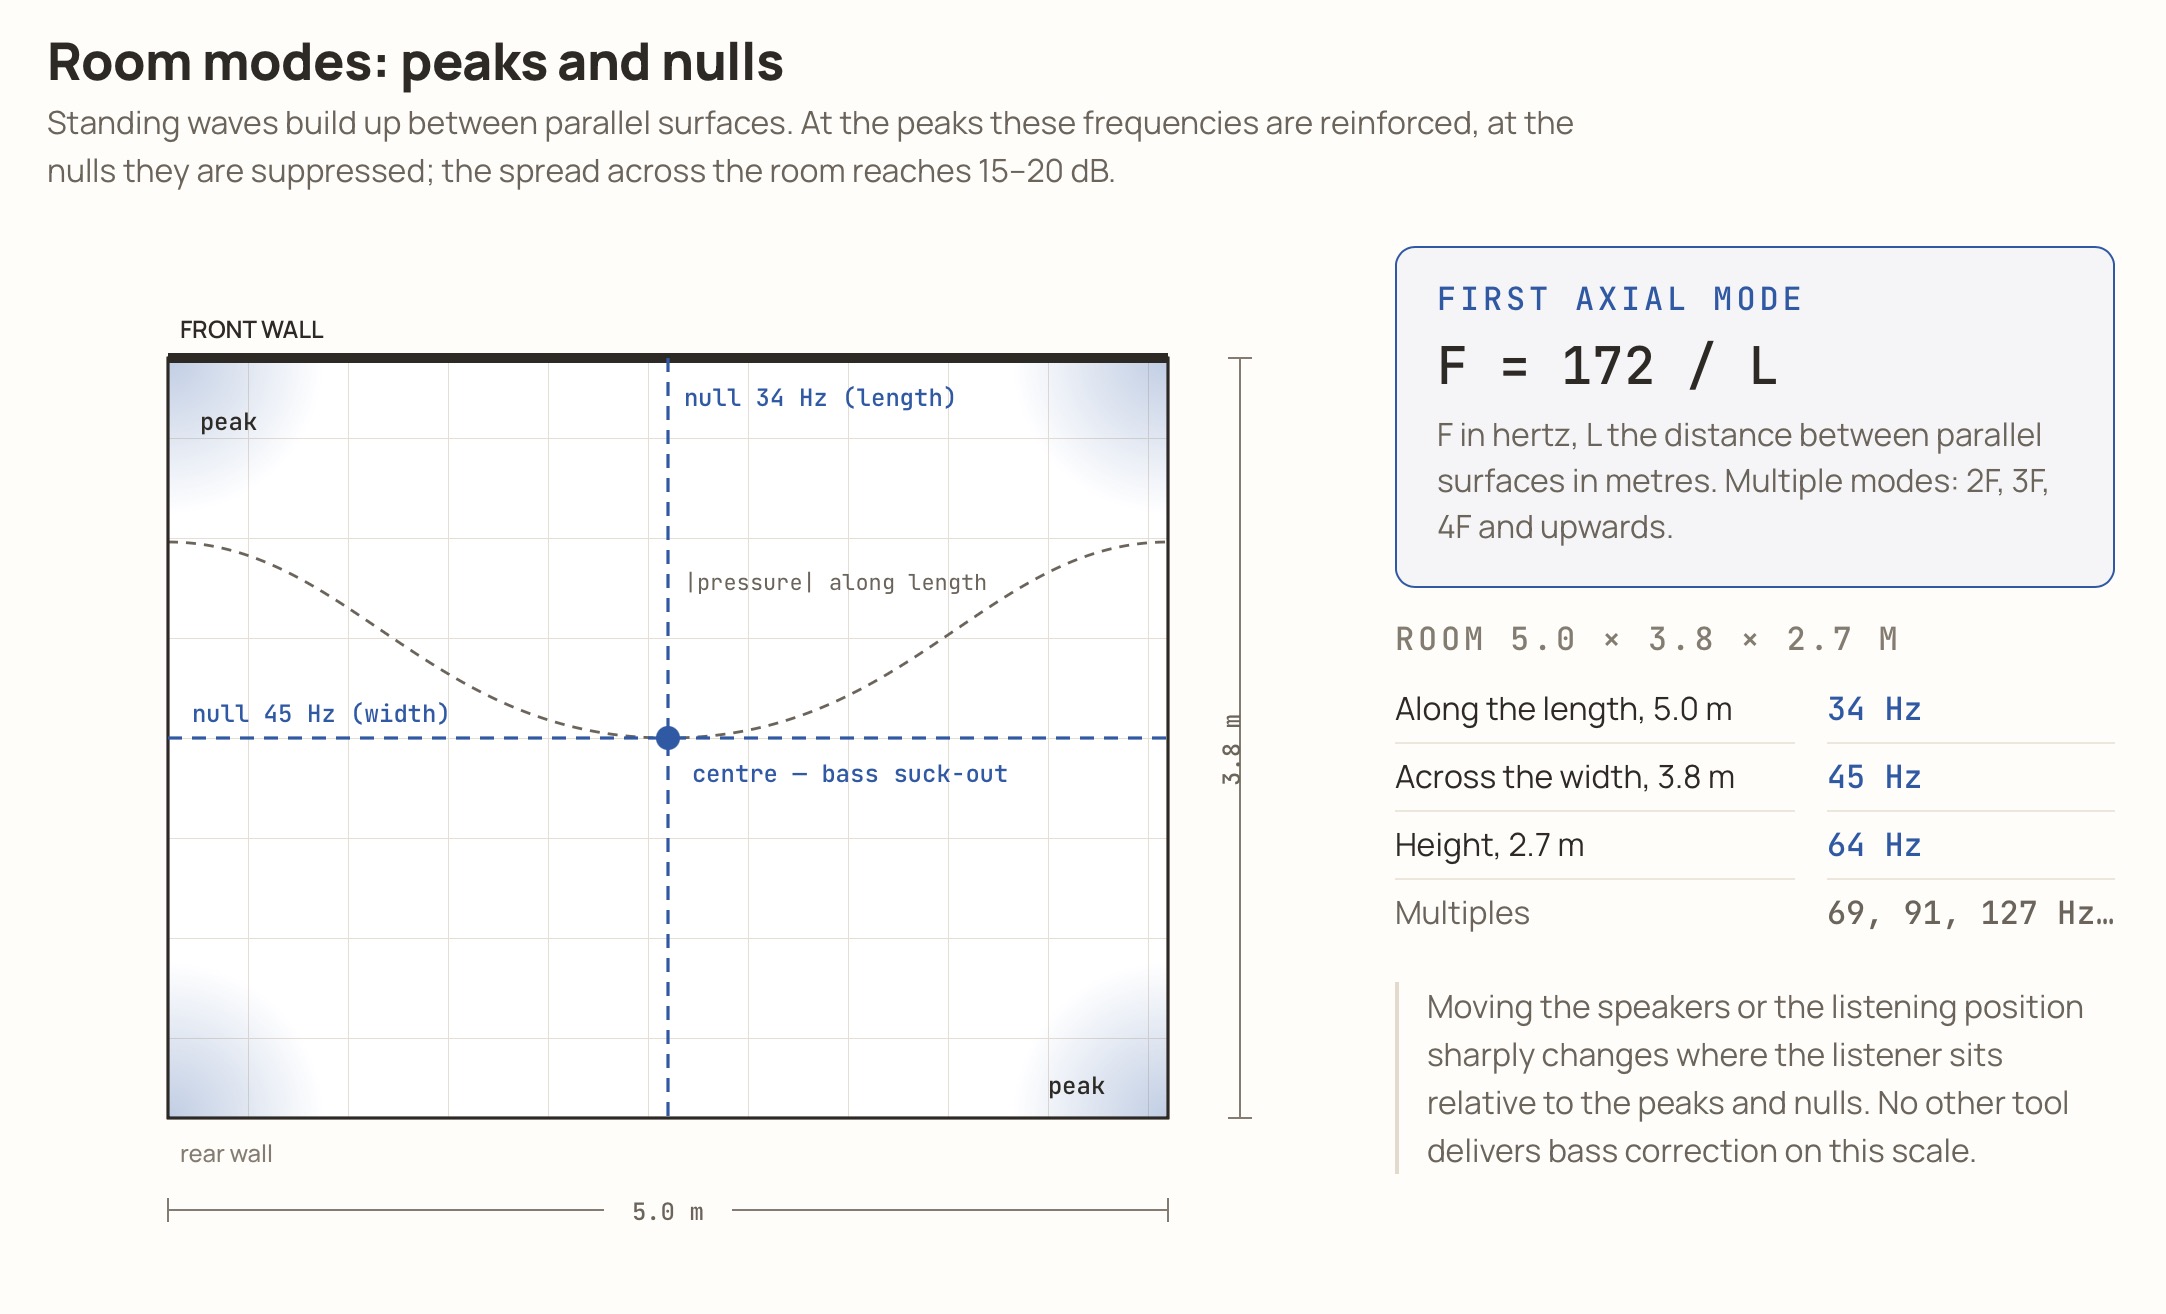
Moving the speakers or the chair, that is to say the listening position of the system, sharply changes where the listener sits relative to the peaks and nulls of the modes. No other tool at your disposal delivers bass correction on this scale.
Modes can also be measured in real time using Dirac software and an external USB microphone.
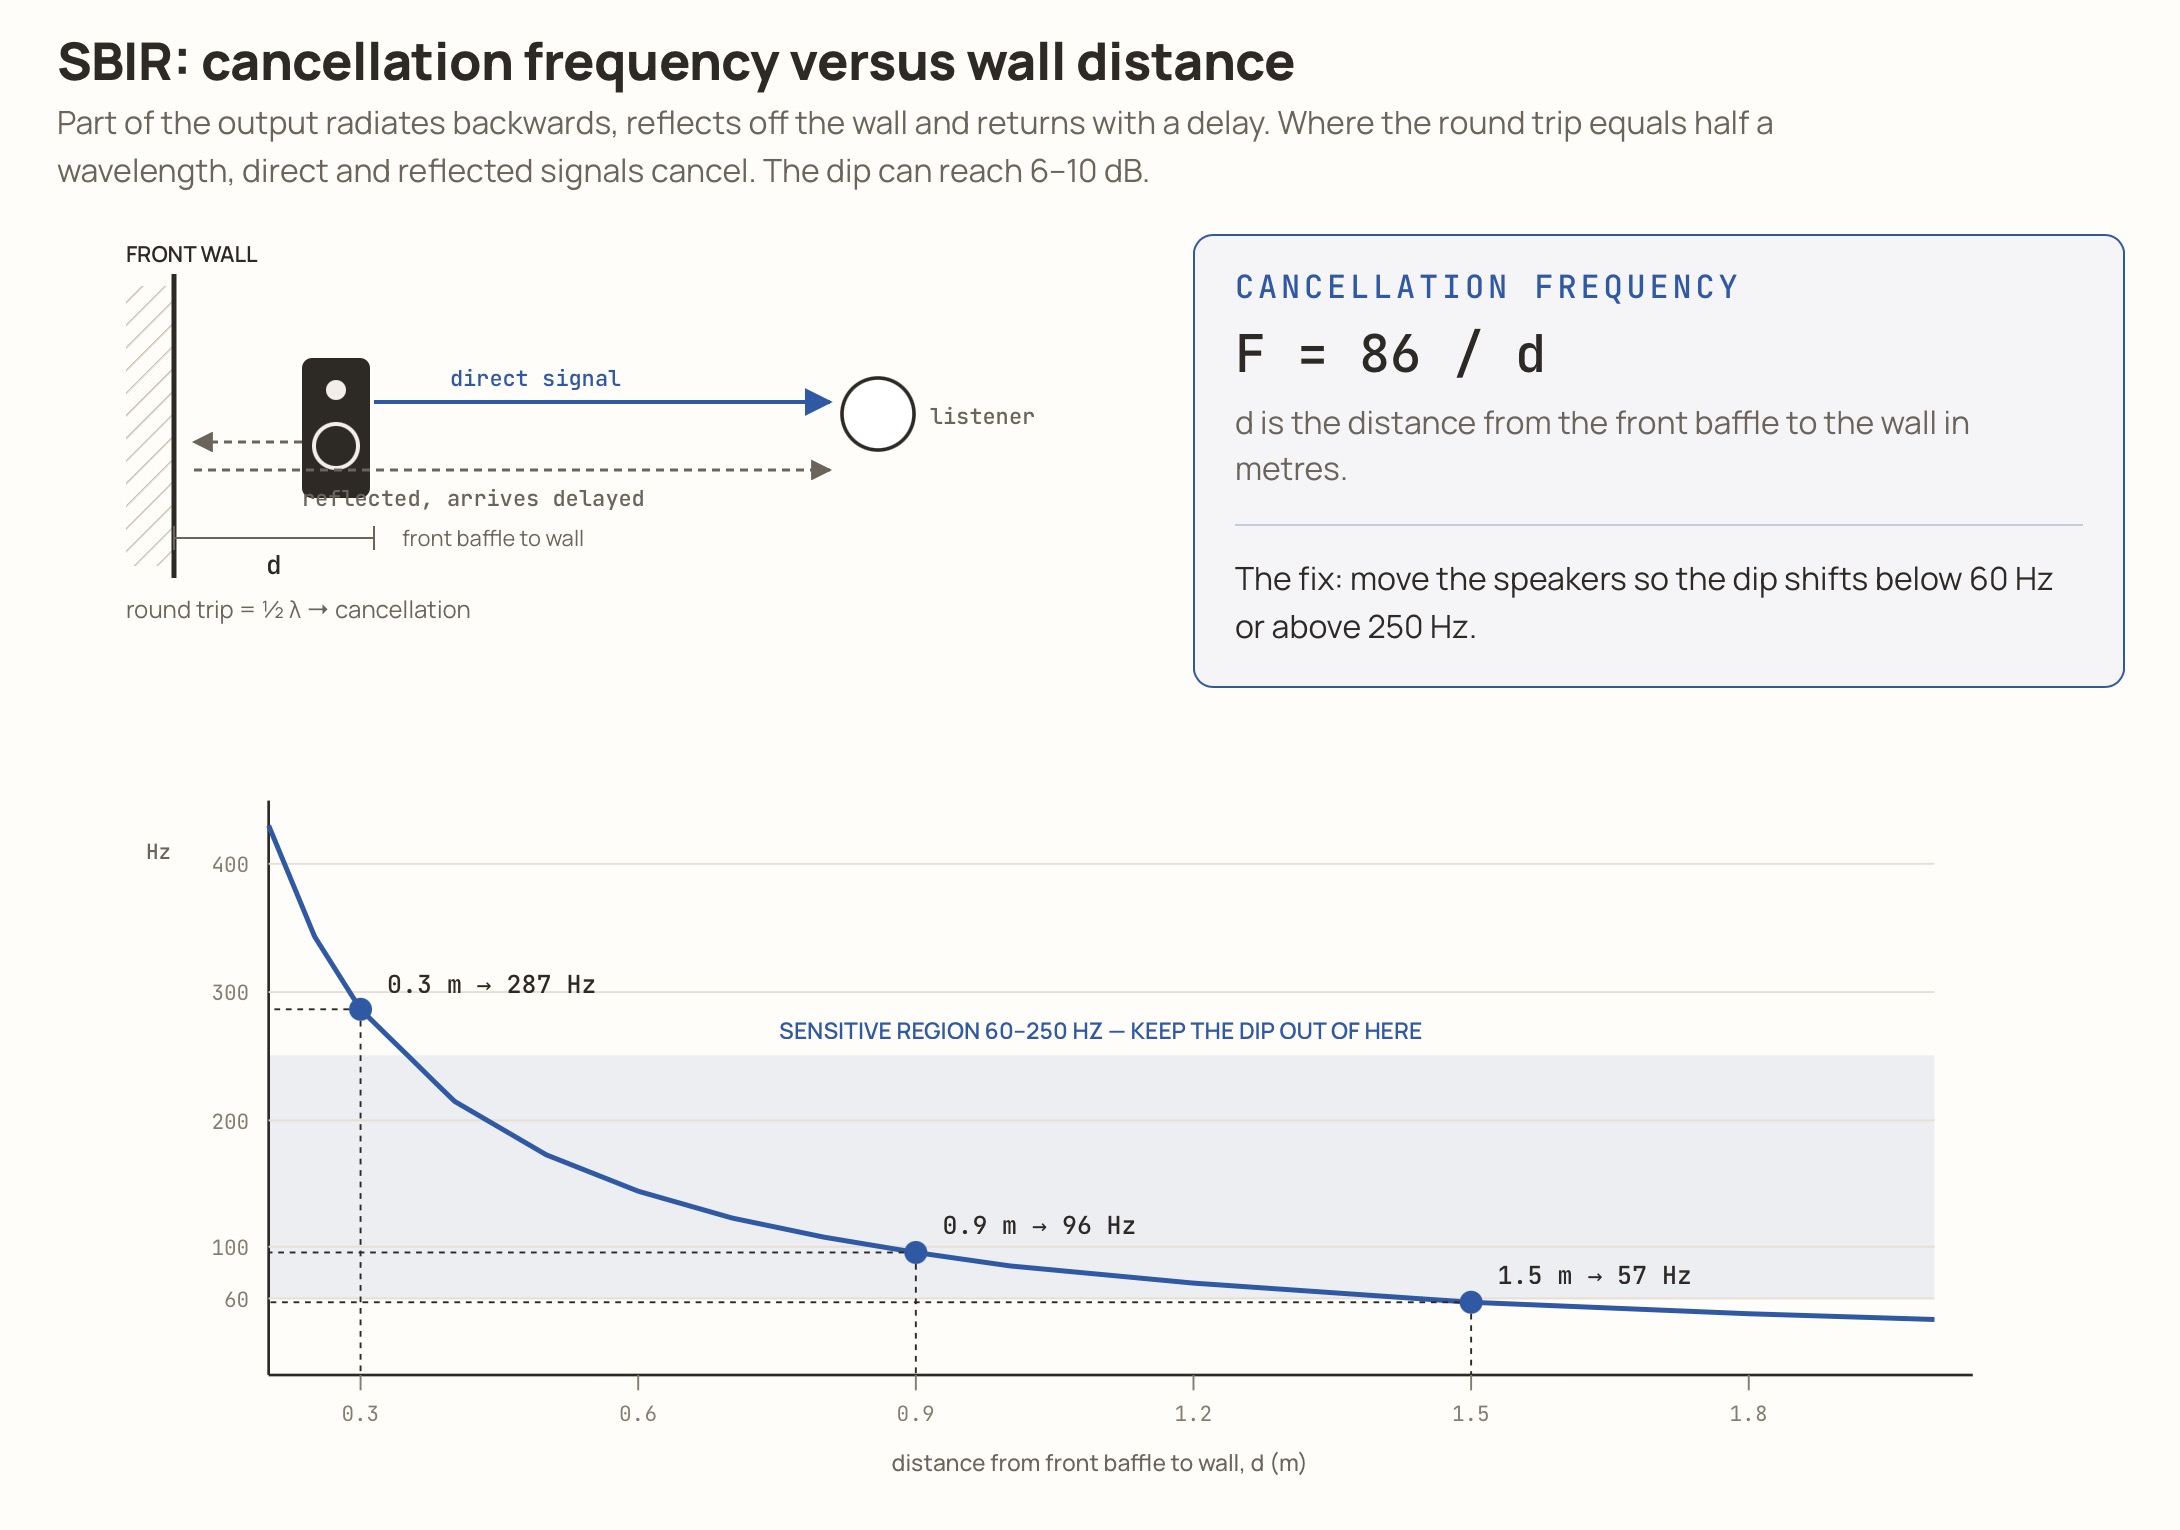
Boundary interference (SBIR)
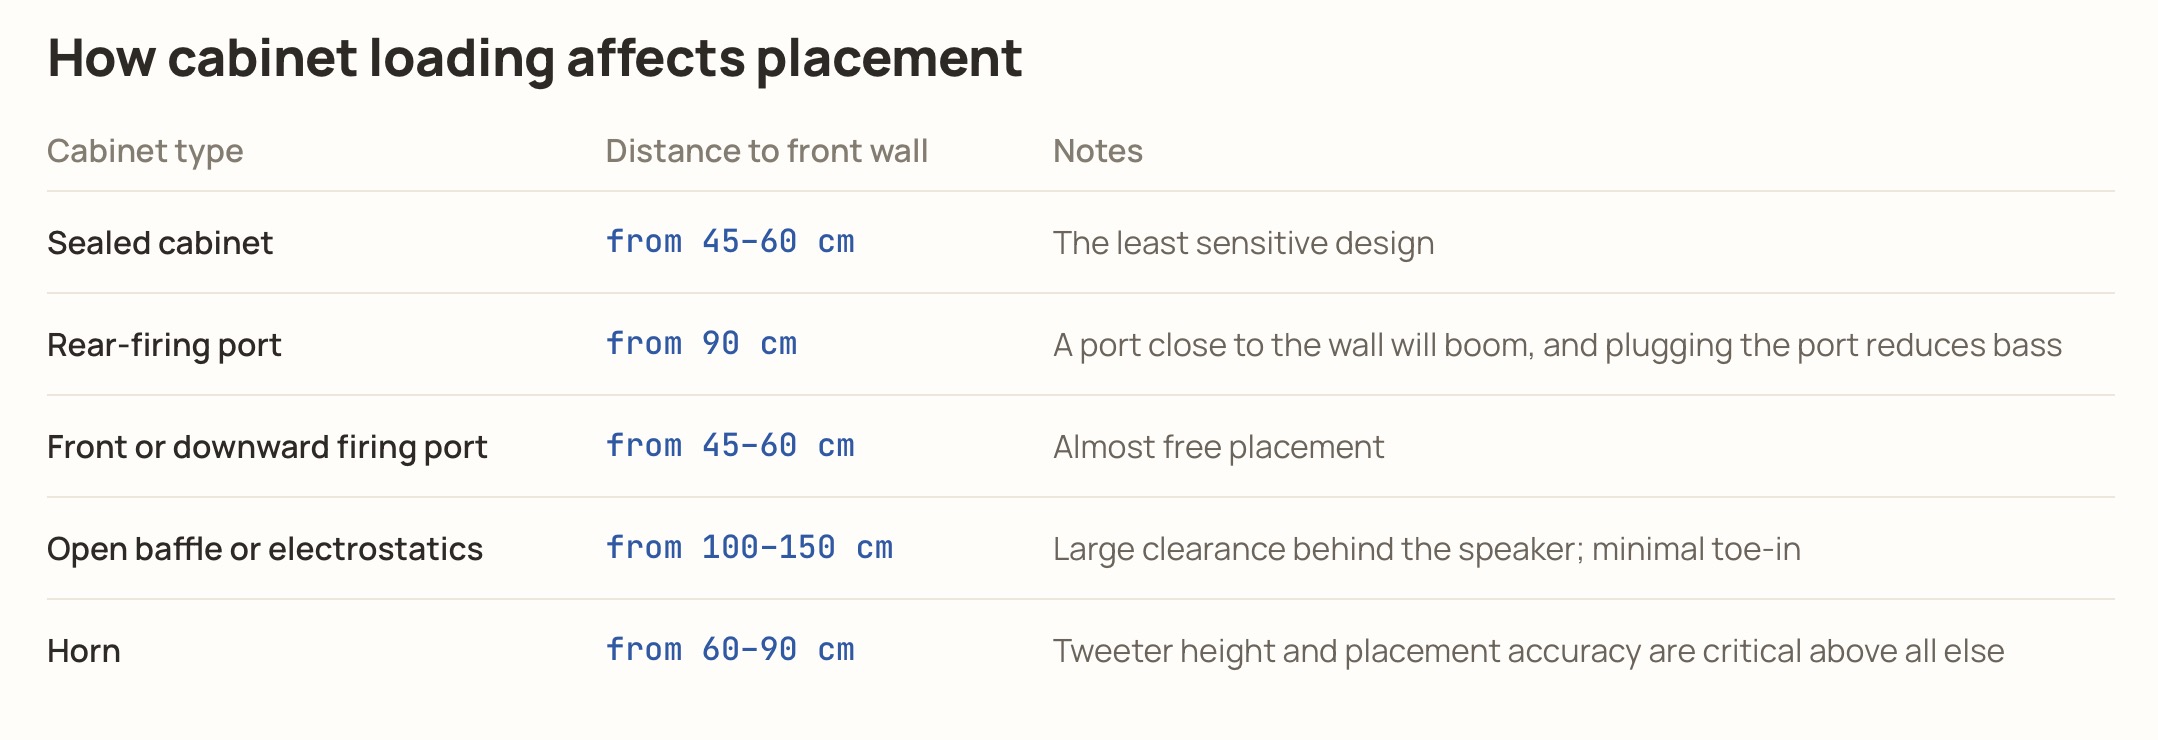
Part of the loudspeaker’s output radiates backwards, reflects off the wall and returns to the listener with a delay. At the frequency for which the round trip equals half a wavelength, the direct and reflected signals start to cancel each other.
Early reflections
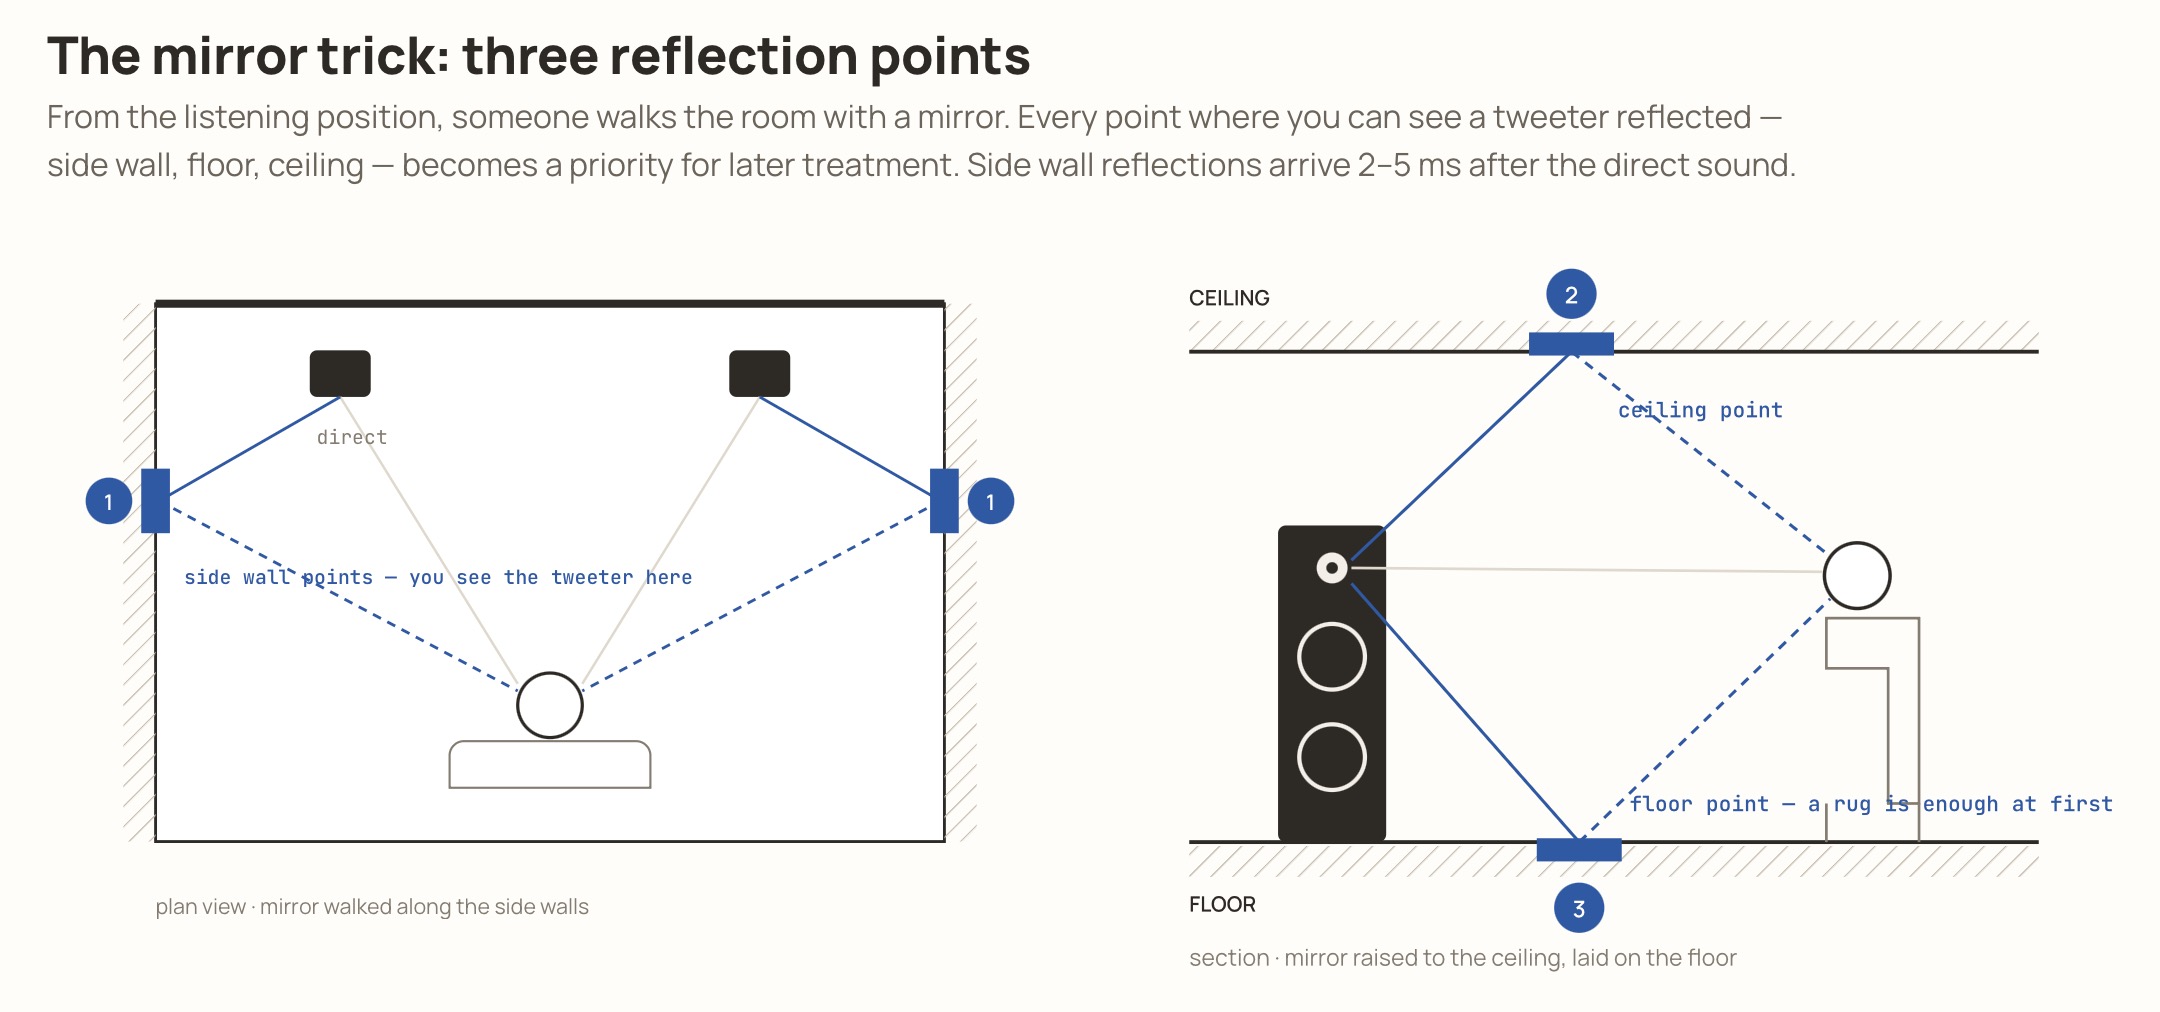
Our ears locate a sound source by differences in time and level. Reflections from the side walls of the listening room reach the listener 2-5 ms after the direct output of the loudspeakers. The result is that the brain gets confused about direction, and you end up with a vague, smeared soundstage.
The right steps to fix the situation
Before you start work:
Write down the length, width and height of the room in metres.
Calculate the first three modes for each dimension using the formula above.
Mark the frequencies that coincide between dimensions. These doubled-up frequencies are your main problems.
Decide which wall the system and the speakers will be set up along. The short wall is the usual choice, for the sake of greater soundstage depth, but long-wall placement can also be justified: in a long, narrow room it moves the speakers away from the side walls.
Step 1: basic geometry
The triangle
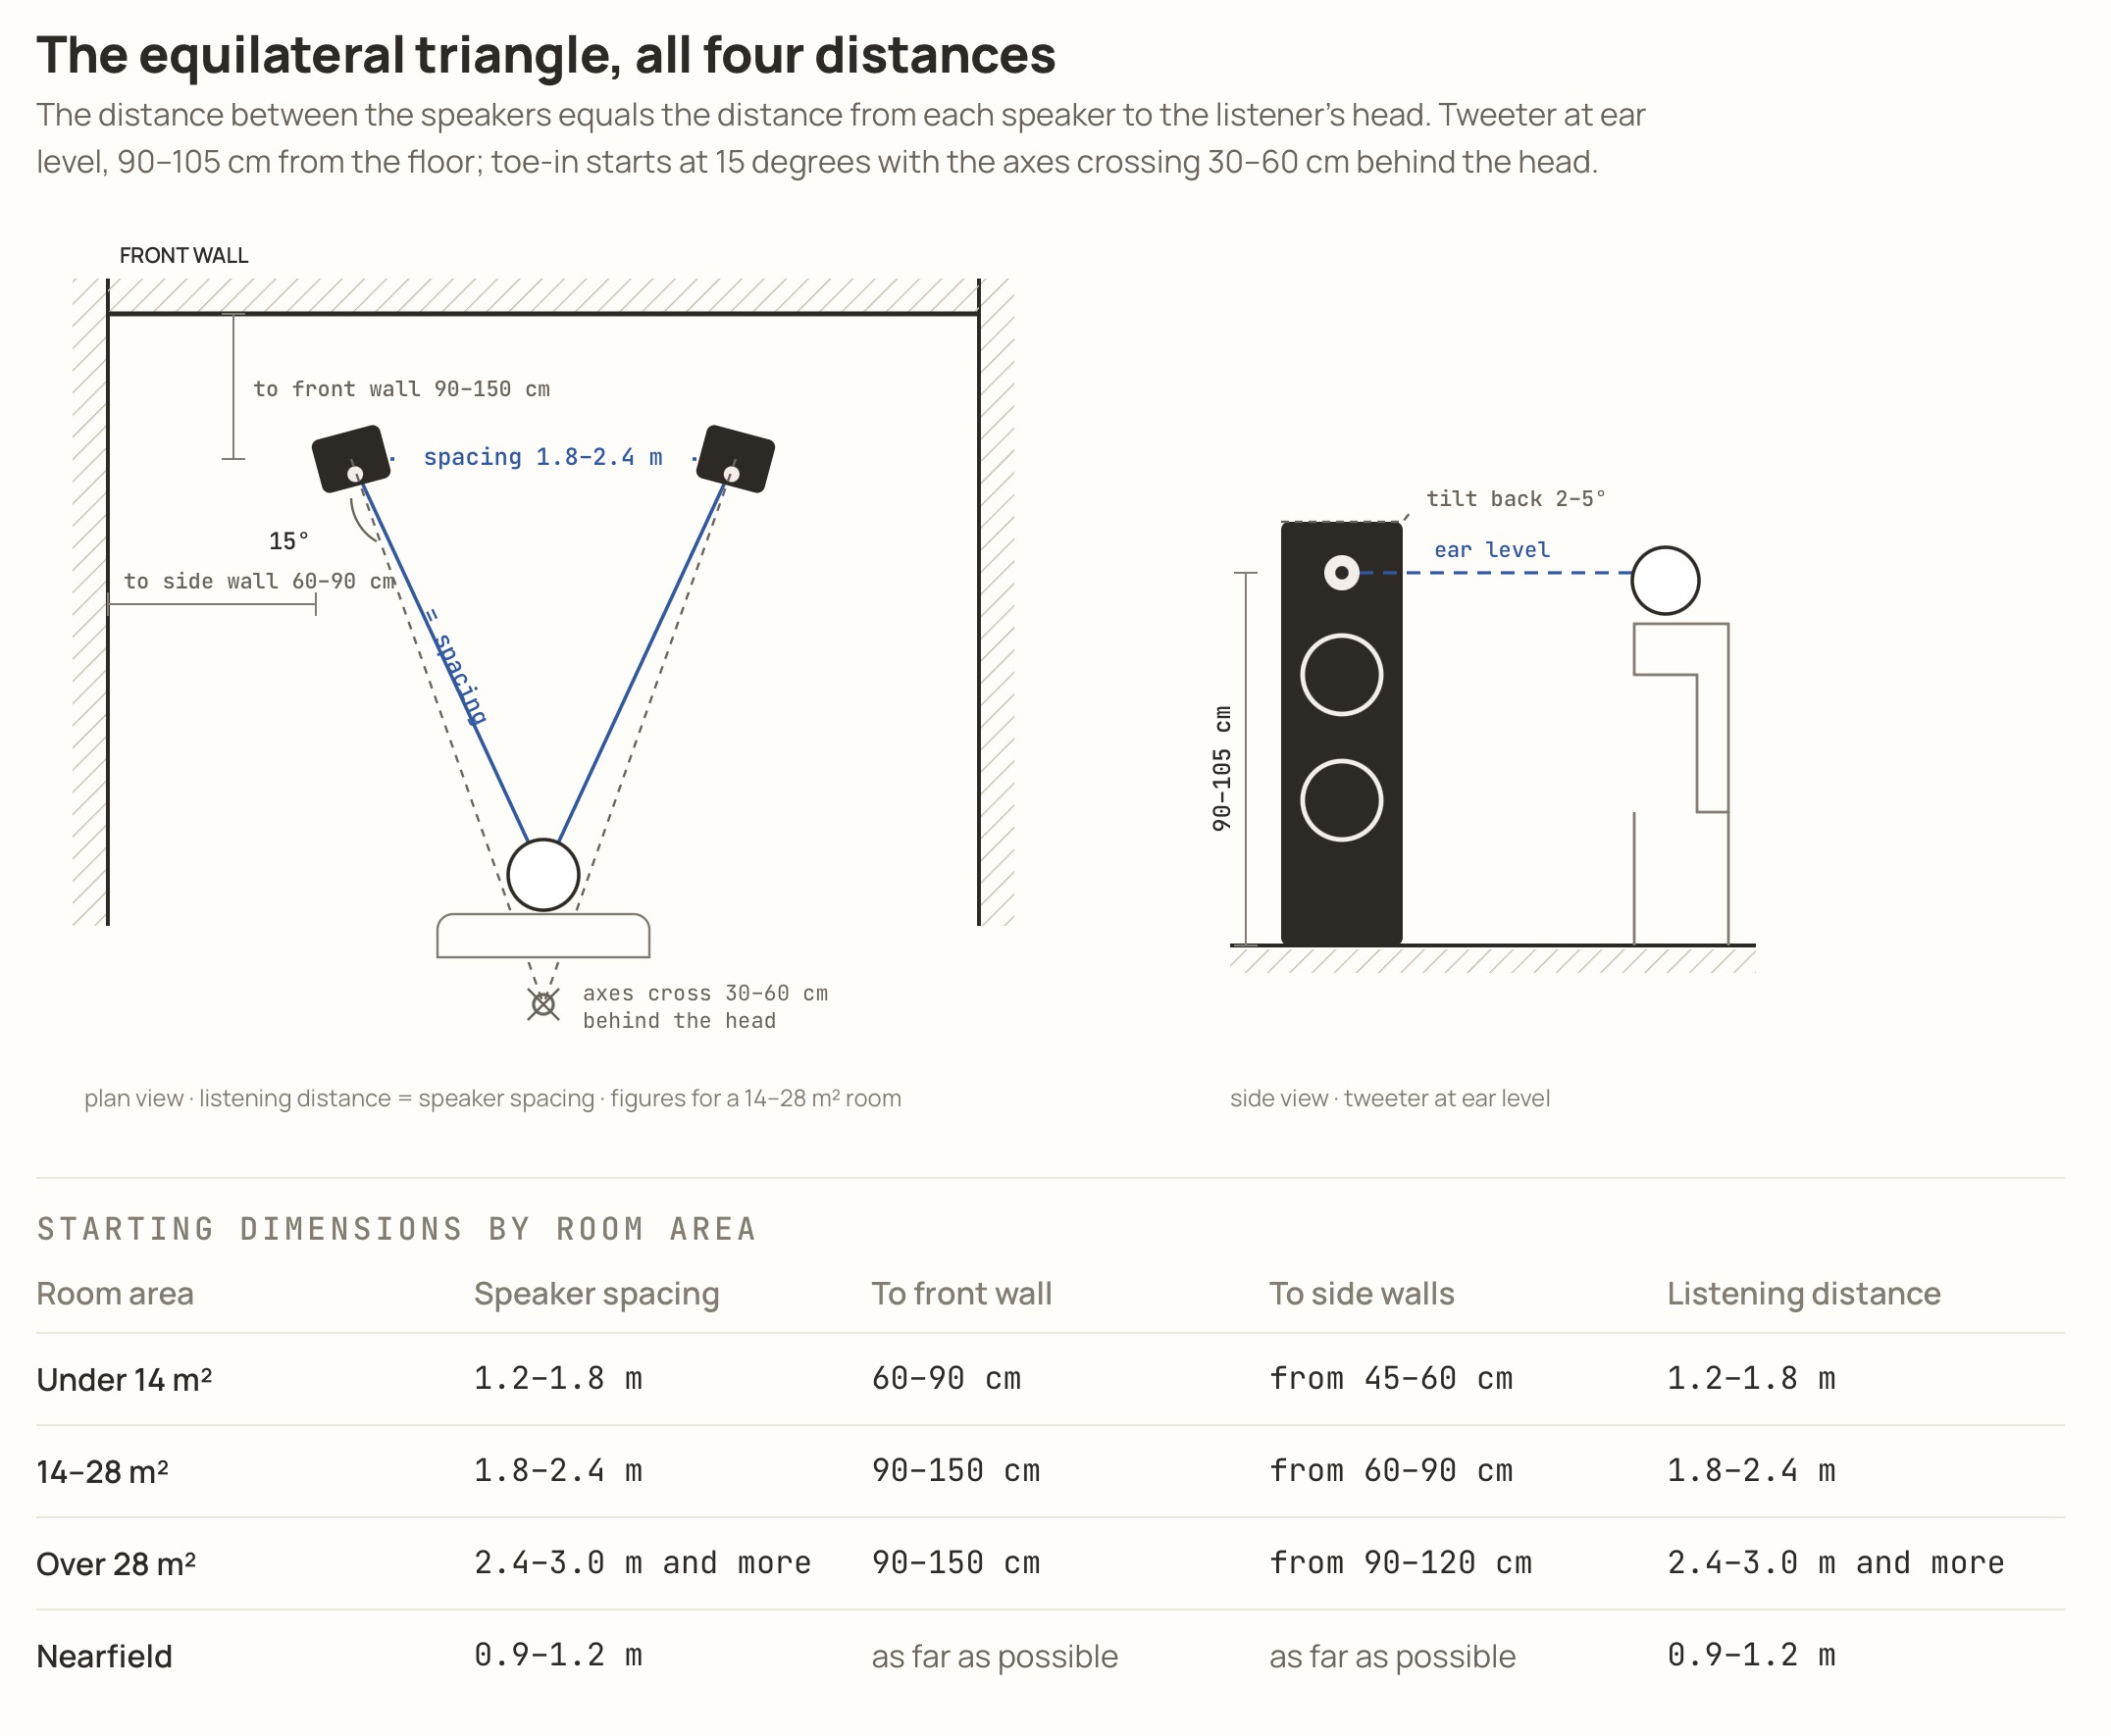
We always start by placing the speakers using the equilateral triangle method: the distance between the speakers equals the distance from each speaker to the listener’s head. This is the simplest way to arrive at solid stereo imaging.
Tweeter height
The tweeter should always sit at the listener’s ear level, which means 90-105 cm from the floor for normal seating on a sofa or armchair. A vertical deviation of 15-20 cm shifts the tonal balance in the upper midrange, while a backward tilt of 2-5 degrees raises the height of the soundstage.
Toe-in angle
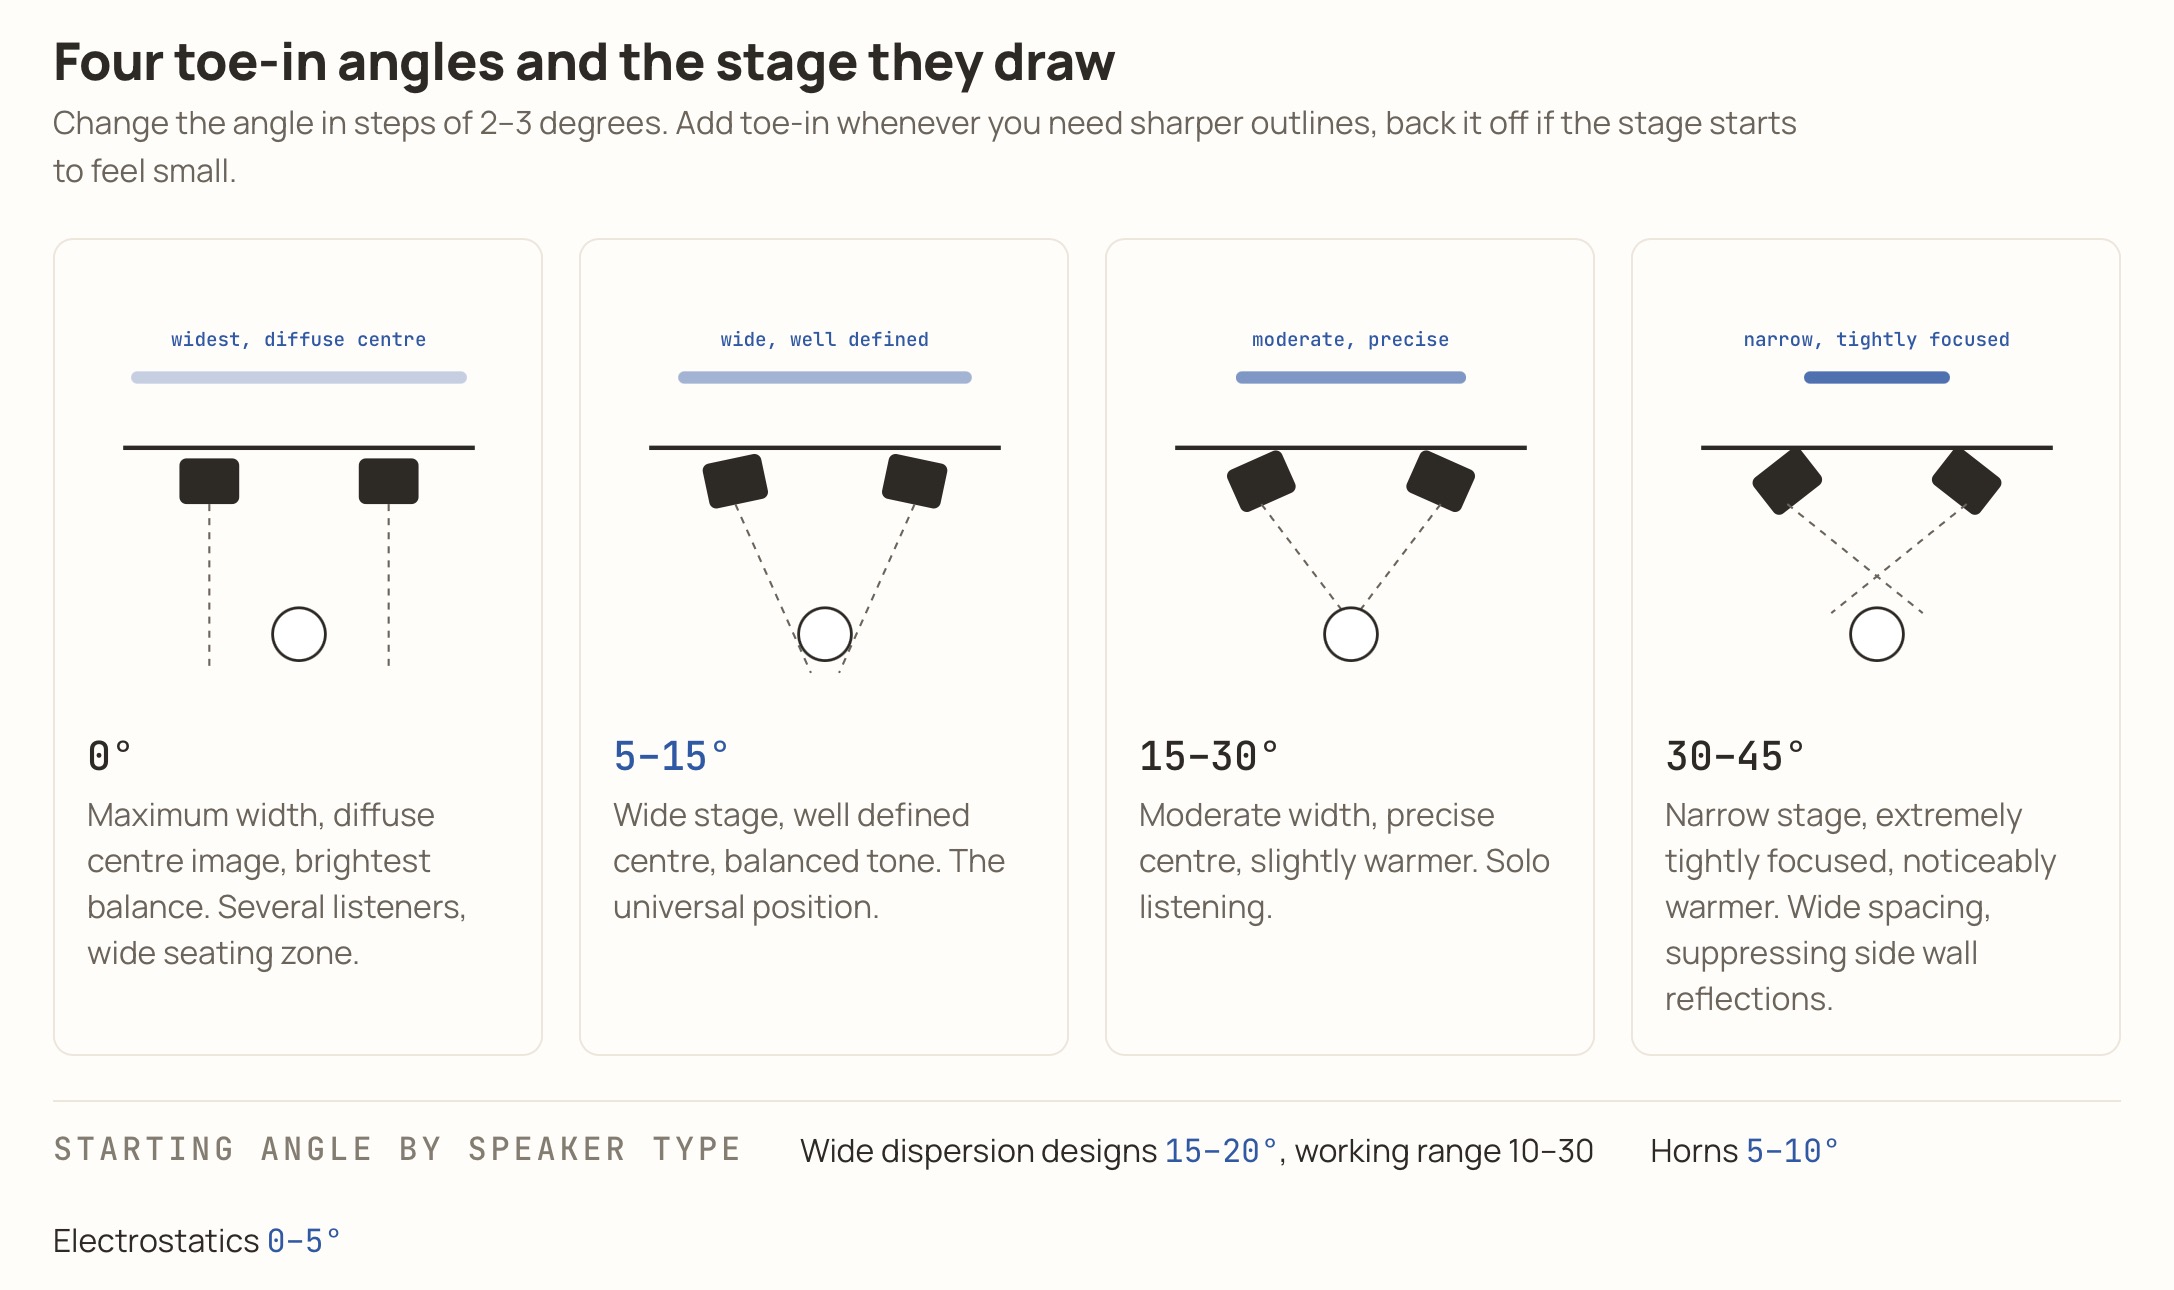
Manufacturers take different views on toeing speakers in towards the listener. Many recommend full toe-in, so that the side panels of the cabinets are not visible from the listening position. It is better to start with a gentler scheme, though: toe the speakers in by 15 degrees, with the speaker axes crossing roughly 30-60 cm behind your head. From there, refine the rotation until the imaging locks in precisely (described in Step 4).
Step 2: the bass
The hardest step, and also the most effective.
Put on a track with powerful, well-textured bass, ideally with double bass playing as part of a jazz ensemble.
Assess note definition. What we want is not boom but precise recognition of notes and detail.
Move the speakers away from the front wall in 10-15 cm increments. At each position, listen to your chosen track for at least a few minutes.
Walk around the room and note the points where bass level peaks (usually the corners) and where it drops away. These are the modal points.
Once you have found an acceptable position, move the speakers in increments of just a few centimetres.
When everything sounds right, mark the position on the floor with masking tape.
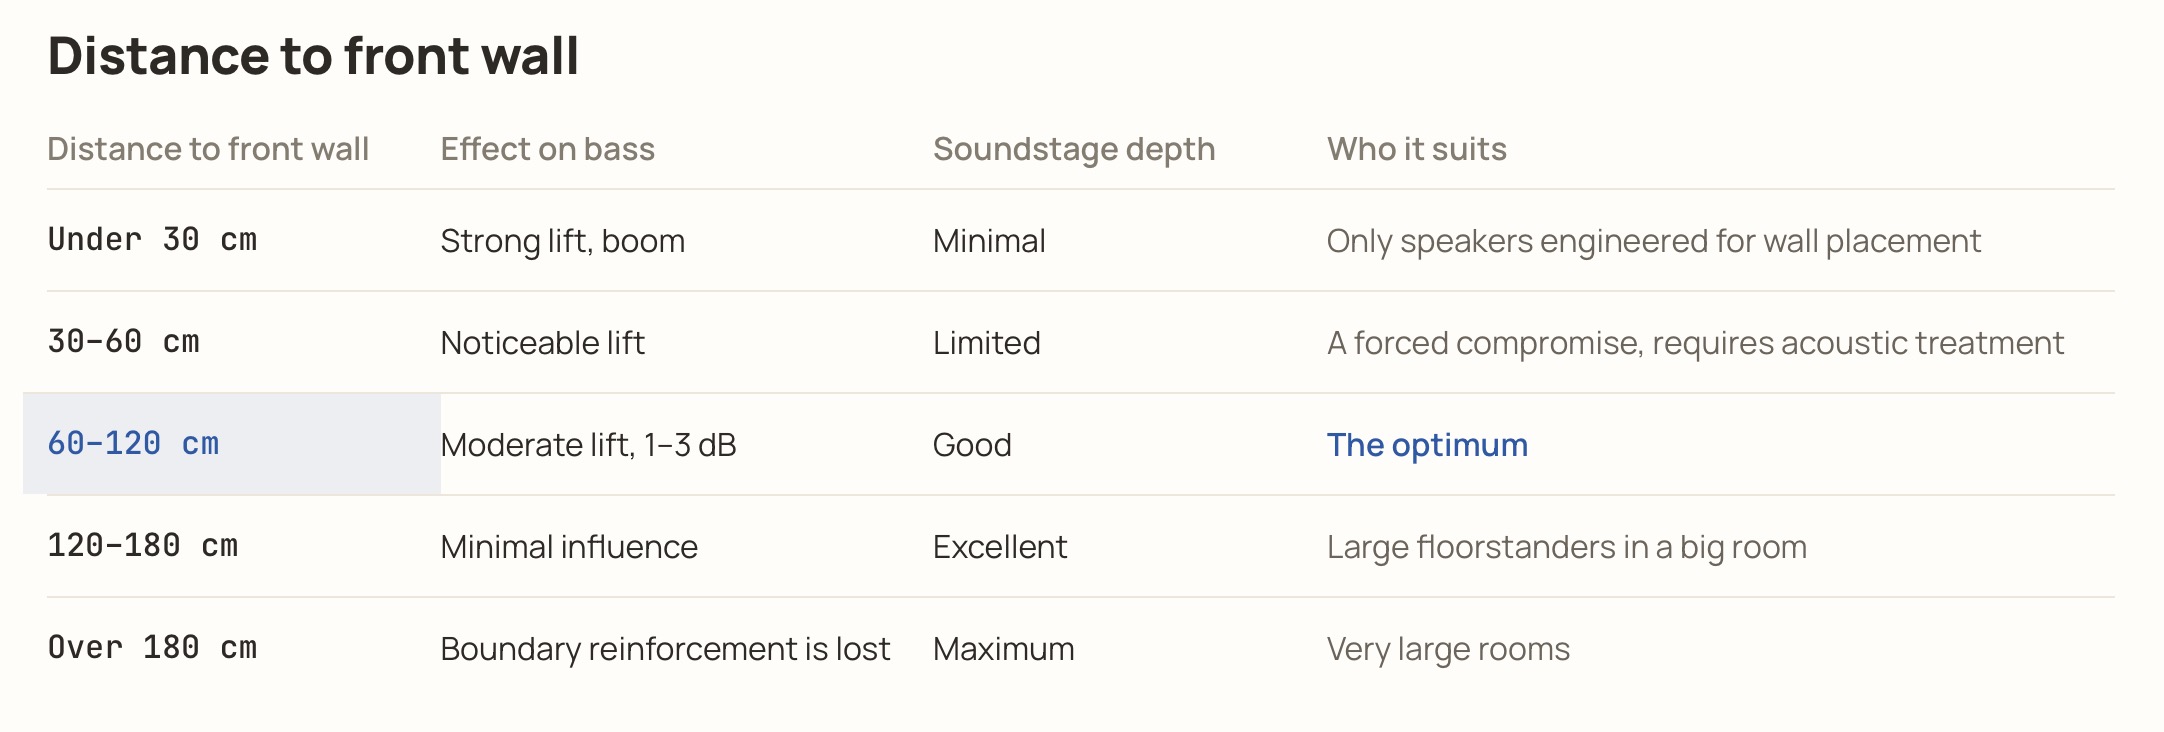
Side wall assymetry
Strict symmetry of the speakers relative to the side walls reinforces the width modes, because the two speakers then excite them in phase. A small asymmetry, on the order of 20-30 cm of difference, reduces that excitation and evens out the bass. Asymmetry in the distance to the walls is acceptable, but the geometry relative to the listener must remain strictly symmetrical.
Step 3: choosing the listening position
Since we have already sketched out the correct speaker placement, we approach the listening position as the reconciliation of two ideals.
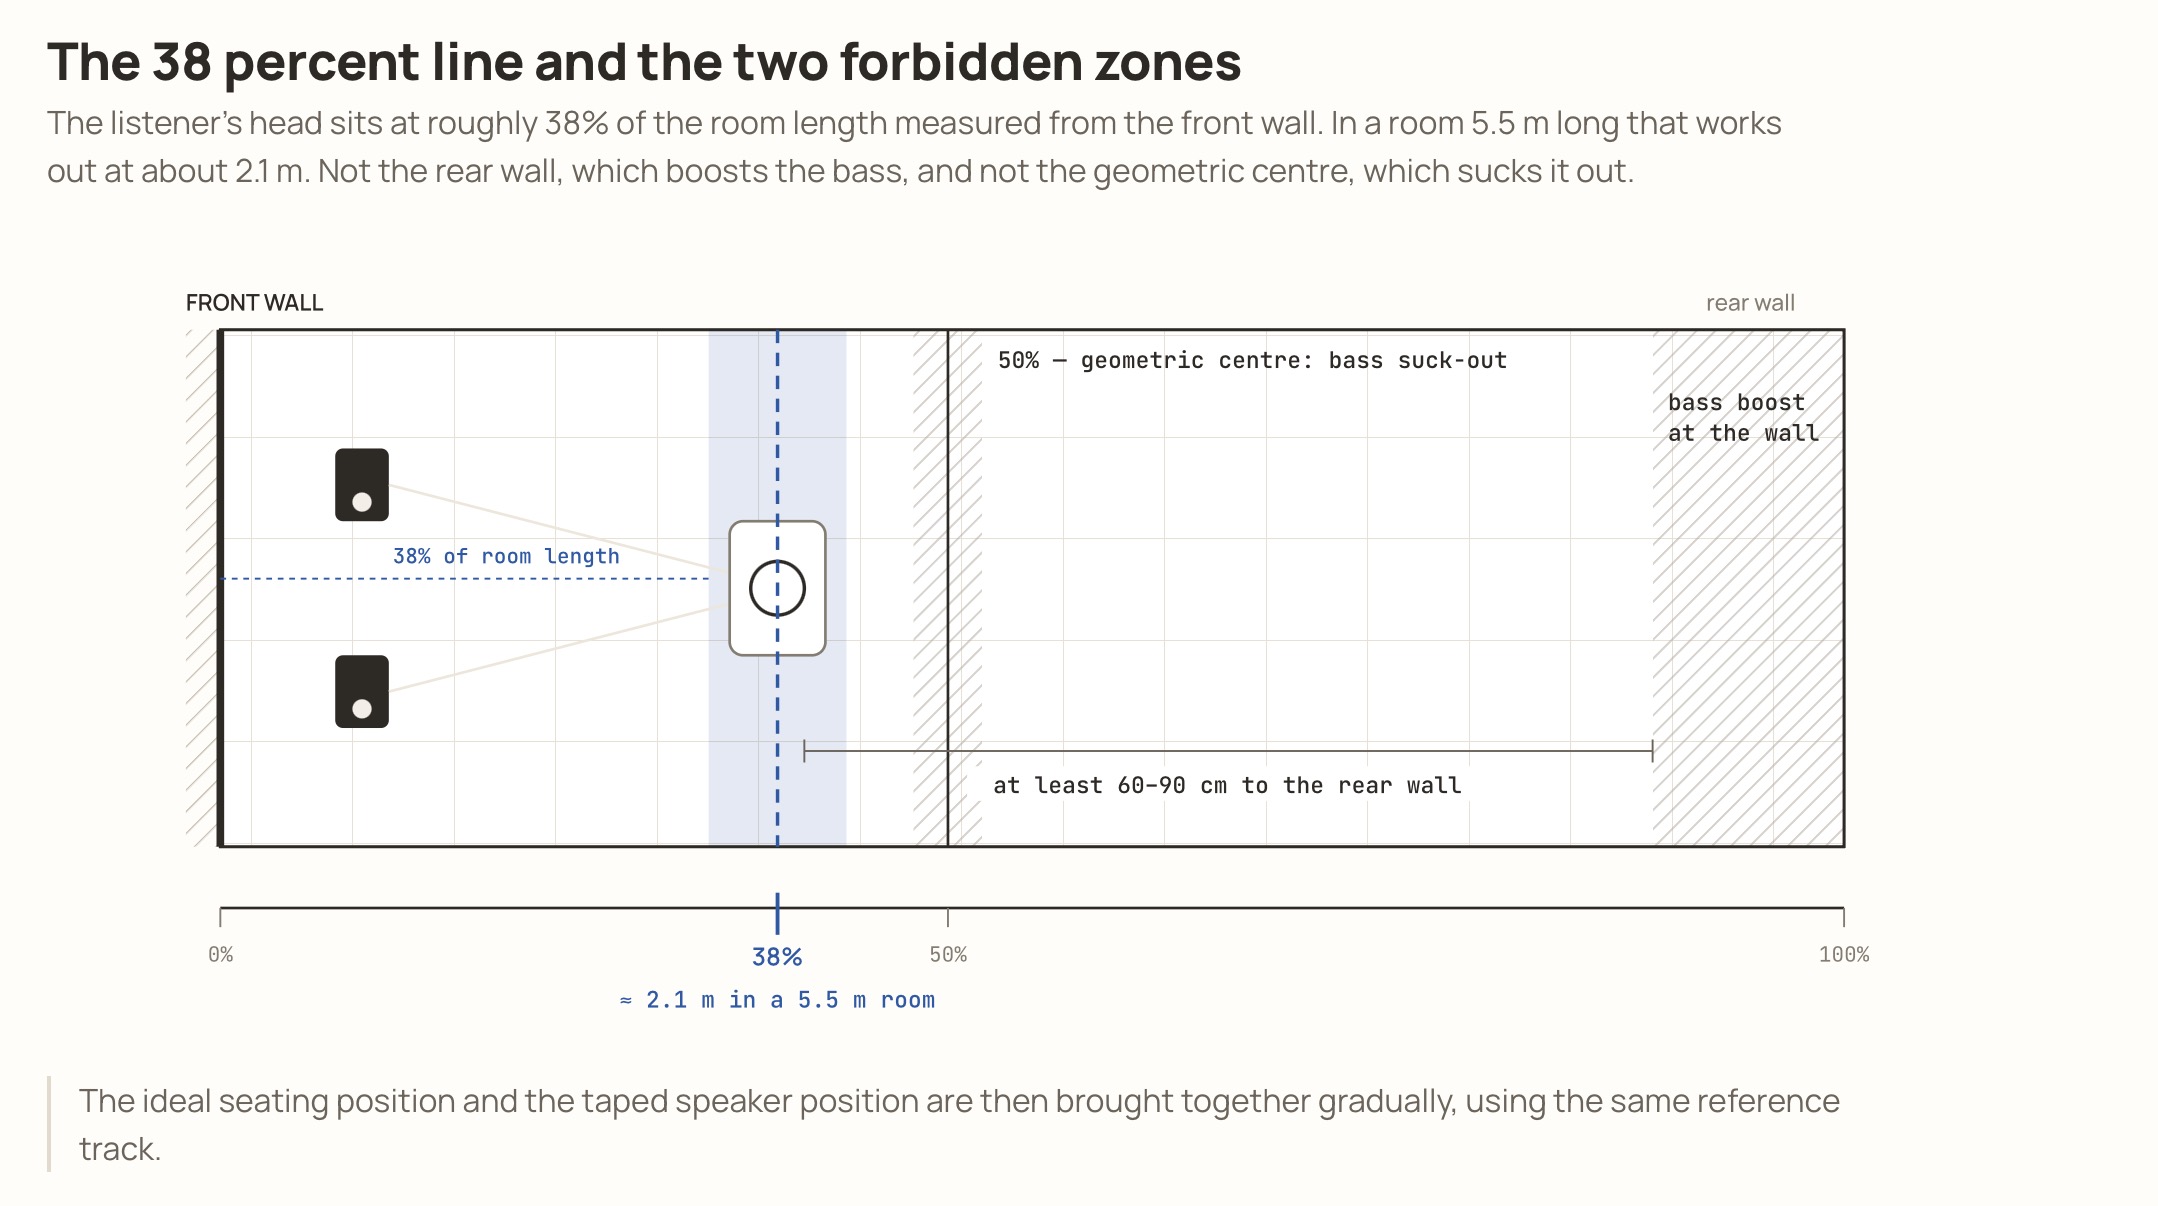
Choosing the listening position starts with the 38 percent rule: the listener’s head sits at roughly 38% of the room length measured from the front wall. In a room 5.5 m long that works out at about 2.1 m. This approach damps the first modes.
What you definitely must not do is put the sofa hard against the rear wall, which produces a bass boost, or in the geometric centre of the room, which produces a bass suck-out. Allow at least 60-90 cm between your head and the rear wall.
Now look at the ideal seating position and at the ideal projected speaker position you marked on the floor with masking tape. Bring the two together gradually, using that same reference track, working towards the best sound you can get.
Step 4: imaging
Now put on a track with a vivid vocal, a Diana Krall album for example.
Change the angle in steps of 2-3 degrees, working towards a clearly drawn image of the vocalist. Add toe-in whenever you need sharper outlines, and back it off if the stage starts to feel small.
General rule
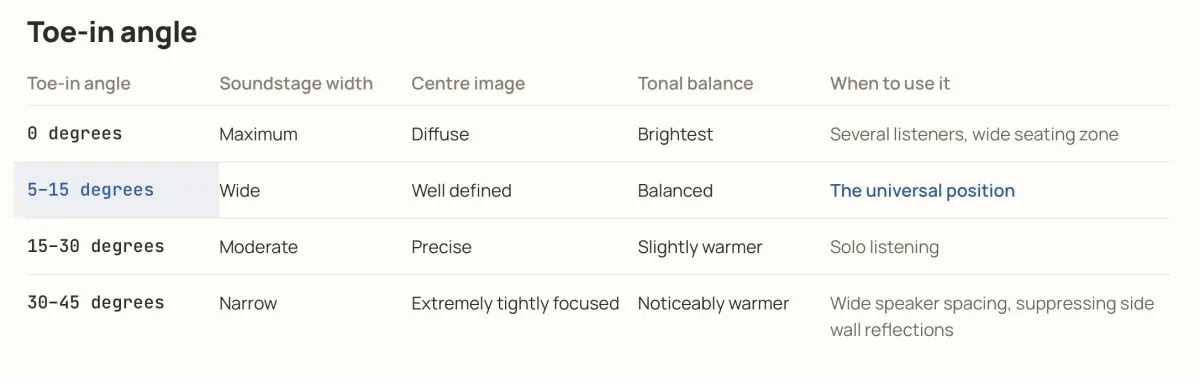
Scenarios
Checking first reflections with a mirror
Sit in the listening position and ask someone in the household to walk the room with a mirror, marking every point where you can see the tweeter reflected: on the side walls, at floor level, and, with the mirror raised, at ceiling level. These points become the priorities for later acoustic treatment. At the first stage, though, a sofa, a rug and curtains will be enough.
Step 5: soundstage depth
Now put on a large symphony orchestra recording.
Move the speakers another 10-15 cm away from the front wall and assess the result in terms of soundstage depth.
Wherever possible, remove everything standing between the speakers.
Pull the sofa forward a little further, increasing the distance to the rear wall.
Add anti-vibration footers under the speakers.
Step 6: verification and finalisation
Now assess the setup across every musical genre, from orchestral and vocal work to rock and electronica, and bring in mono tracks as well.
Play a mono recording and assess how tightly the image locks between the speakers. The vocal should sit dead centre and sound as though it comes from a single source.
Check the energy of rock material and experiment further with toe-in.
Mark the final positions with tape.
Typical layouts for different rooms
Small room, under 14 m²
Spacing of 1.2-1.8 m, no more than 60-90 cm to the front wall, maximum toe-in of 15-25 degrees to suppress side wall reflections. Standmount speakers are the better choice here.
Medium room, 14-28 m²
The most flexible case of all. It sets up without difficulty following the scheme described above.
Large room, over 28 m²
The room eats the bass. It makes sense to reduce the distance to the front wall to 90-120 cm. Spacing from 2.4 m, toe-in 15-30 degrees. If the floorstanders are on the small side, you will need a subwoofer.
Long, narrow room
Strong modes along the length of the room. Bass traps are essential, and even with them short-wall placement may not come off. Try setting the system up along the long wall.
Square room
This one is a nightmare: the length and width modes coincide and add together. Everything will have to be arranged asymmetrically, offset from the centre. This is the case where acoustic treatment is strictly mandatory.
Nearfield or desktop
Spacing 0.9-1.2 m, equilateral triangle, toe-in 20-30 degrees. It is all straightforward here. The only issue with a desk is reflections off the tabletop, so you will need an absorbing mat.
The main mistakes
Speakers hard against the wall for the sake of the interior. You get boom instead of bass.
Speakers in the corners. Every mode is excited at once. This is only used with specialised designs such as earlier versions of the Klipschorn.
Sofa hard against the rear wall. The soundstage collapses.
Different acoustic environments to either side of the speakers (a cabinet on one side, a window on the other). Acoustic treatment will be required.
An equipment rack between the speakers at ear level. A large reflective surface in the most sensitive zone. Better to move the rack to a side wall.
Speakers set up with no toe-in at all. The stage will be wide but completely unfocused.
Acoustic treatment before placement has been optimised. Treatment corrects what placement could not, and not the other way around.
What comes next: acoustic treatment of the room
Placement neutralises up to 40% of a room’s problems. The rest are solved with dedicated acoustic treatment:
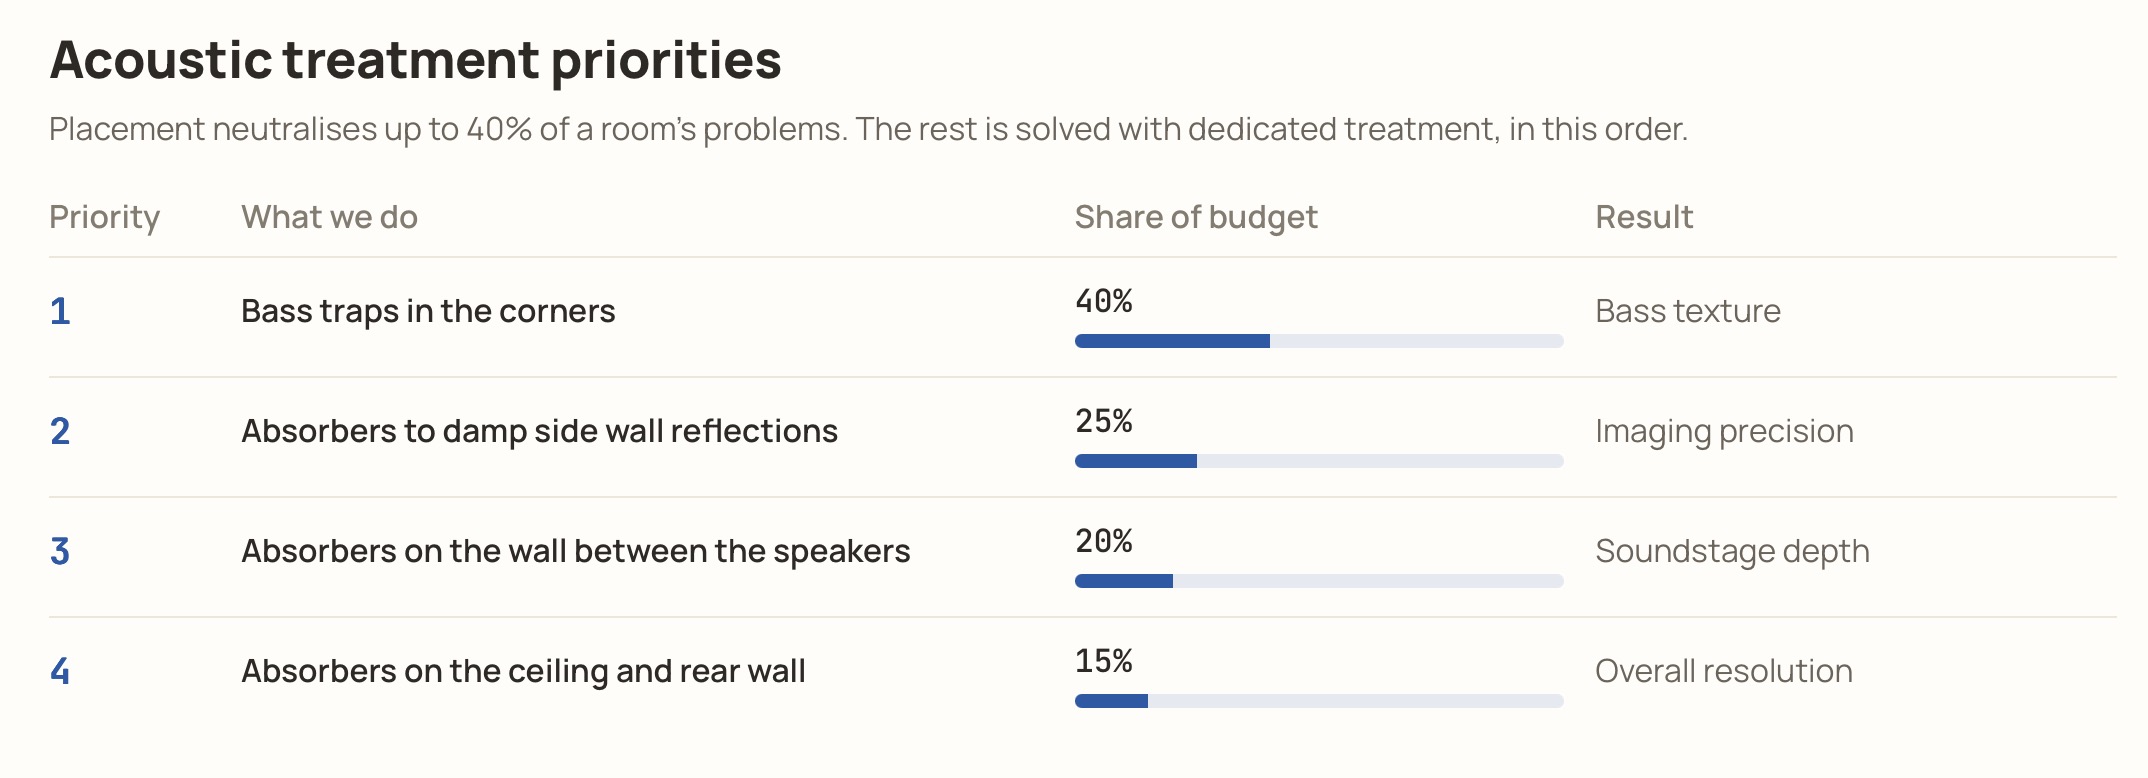
If even that does not fix things, the next move is digital room correction.
Checklist
Measure the room, calculate the first modes, choose the wall for the speakers.
Build an equilateral triangle, set tweeter height, apply 15 degrees of toe-in.
Dial in the bass by adjusting the distance to the front wall in 15 cm steps, then finalise in 2-3 cm steps.
Find the listening position starting from the 38 percent rule and reconcile it with the speaker placement.
Set up imaging with toe-in in steps of 2-3 degrees.
Check soundstage depth.
Verify the result across a range of musical material and lock it down.
How to choose speakers read here https://www.hifiverse.io/articles/audio/floorstanding-vs-bookshelf-speakers-2026